Sunday, 23 February 2014

Felt Making


Felt making is a much more physical demanding medium in comparison to silk paper making. Not only do you require patience, and strength but endurance – as I soon found out. The origins of the art range from continent to continent, in other words everybody thought it was a good idea.

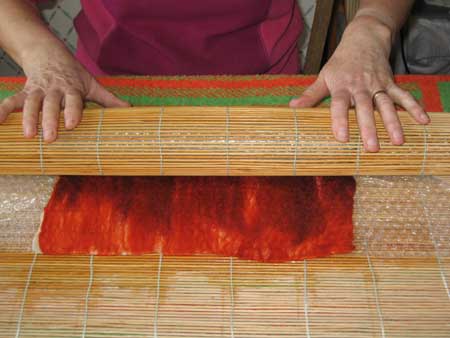
To begin you will need two sheets of voile, a bamboo pad, soap flakes, hot water, a water bottle, a towel, and wool fibres – these fibres can be found in any good haberdashery or craft shop. Mix the hot water and the soap flakes in the water bottle. You should work on a sturdy flat table, begin by laying down the towel, a good work area is essential to the process. Place the bamboo pad on top of the towel, then lay down one sheet of voile. Start by selecting your wool fibres, you will need to pull out wisps of fibre and place the first layer vertically on the voile. A second layer must then be placed horizontally over the first layer of fibres - this is done so that the wool becomes matted as the fibres will intertwine. Continue this process for another two layers; remember not to make your layers too thick as it will take longer to create the felt. Then place the second sheet of over the felt, and douse the felt with the soapy water until all the fibres are completely soaked.
http://www.studioarts.co.uk/images/education/artroom2012.jpg
 
Now the physical part, roll up the bamboo pad tightly with the fibres inside and begin rolling, you should roll the pad 100 times constantly checking the progress of the felting - don’t be afraid to put a bit of elbow grease into it. Continuously douse the felt as you are rolling as it will help in the matting process. When the felt is fully matted the fibres should not lift easily from the surface. In the final stages of the felting you must rinse the felt and get rid of most of the water, I recommend throwing it at the sink as the force of impact causes the water to travel from the felt. Allow to dry.

You can also make a felt bowl with this method by placing a strong disc of plastic in between layers of felt fibre and rolling in the same manner as you have done above. When the felt is dry cut a circle on one side of the felted disc and remove the disc, it may need a little manipulation to make it more of a bowl shape.
http://www.thecraft-studio.com/wp-content/uploads/pots1.jpg
 

I felt that the process has been beneficial for me as I had never had the opportunity to make felt before, though I had always been told about it. Yet, there are several constraints with the medium that in my mind act as a ‘deal breaker’ when it comes to me and felting. The materials, the wool in particular, is too expensive for just experimental use, as a student it is a lot of money to put into a medium that I may not use. You are also limited with the size of felt pieces that you can create; if I was to use felting I would need to make large panels for it to be any use.  

Wednesday, 12 February 2014

Silk Paper Making


Being the first time I had ever come across this medium, I found it to be an incredibly simple process – simple enough for even me to deal with. Silk paper is a thin layer of silk fibres that have been compressed together by a thin layer of cellulose paste. The outcome leaves a sheet of smooth paper-like material that can be sewn into, cut up, moulded.
Firstly, you will need two square cut sheets of voile, silk fibres, and cellulose paste. I would also recommended doing this on a washable surface as the cellulose paste can be quite sticky. Place a sheet of voile onto the surface making sure it is flat. Taking your silk fibres, begin layering wispy pieces of fibres down onto the voile, gradually building up an even layer. At this point you may also want to add threads or ribbon for added texture. Place the second square of voile over the top of the silk fibres. You can now begin using the cellulose paste; it may need a good mix with a little water, it should be like the consistency of custard. Evenly spread the paste over the top layer of voile, using your hand to push it through the voile. All the fibres should be covered with the mix to ensure the best results. Gently remove the voile and lift the silk fibres from the sheet then lay down on a flat surface to dry. You may also want to try moulding the paper around a cup or bowl, anything that takes your fancy.

The process is very easy to pick up and is an ideal method of creating textile art. However, for me there are a variety of constraints that I have found with the medium. I cannot see myself using it on a regular basis as it is quite limited in its results and the materials are also very expensive. I would only invest in the materials if I was going to use it on a regular basis. But, as I always say don’t allow me to put you off; it is definitely worth the try.

Thursday, 16 January 2014

Photoshop + Me = ERROR.


We were introduced to the magical world of Photoshop this week I can honestly say I was by no means enthused by the prospect of doing another week of it. The truth of it is this – I have been doing Photoshop for years. I only use it for posters and I have never considered using it for artwork. I am just not excited by it at all, which it really bad for me to say because I feel like I’m wasting my lecturer’s time. I will keep at it for the next few weeks and see if it leads to anything, but for now on can only hope.  

Friday, 10 January 2014

Cut Me a Collage


A recent workshop that we took part in was collage pieces inspired by the works of Matisse. Matisse’s large, vivid pieces were created during the latter part of his life due to his decreasing health, having been diagnosed with cancer. Wheelchair bound he raced to generate the final flurries of his artistic mind. The collages that he produced in these years are considered to be his greatest works. Taking the freedom of shape and colour as my own inspiration I tried to make my own collage works relating to the brief. I would say like most things I do, it does require some fine tuning.

Sunday, 22 December 2013

Scale II - The Finals


 The piece above was inspired by the Black Death, I have used a map typical of the 1300's for the basic shape, and rimmed it with gold/yellow embroidery thread. Using acrylic to create the textured surface resembling the bulbous symptoms of the plague, then adding knotted red thread for scabs and salt for a festering appearance.


Titled 'Black Wave', this piece is acrylic on linen - hand painted. A resonating image for me was the black wave of water that followed the tsunami in Japan, I thought of the loss of life that was caused by this singular event and developed this design.


Raindrops and Rooftops - Hurricane Katrina overhead view of the houses affected by the flood

Tuesday, 17 December 2013

Glass Fusing - An art yet to be mastered

My flimsy attempt at glass fusing
As part of our Transformation brief we were given a class on glass fusing, that proved to be less than succesful in my case. The prinicpals of glass are simple or so it seemed. The cutting tool has a small blade sometimes with a oil cartridge included, topped off with a rounded metal sphere on the end. To cut the glass you must hold the blade completely vertical above the glass and move in continuous straight line. Then using the ball, tap the underside of the glass, your cut acts as a breaking point and as you are tapping underneath the glass will start to shard. Once you arrange your glass in the way you like it is ready to go into the kiln. Just a general warning - DO NOT try this at home in your oven, I don't speak from experience, but I speak as a person who has the common sense not to try. The reason I say this is because glass can explode if cooled too quickly.

It seemed that in my first attempt at glass fusing I was just not able to tell the glass what to do. I think it may have had something to do with my abundant lack of straight lines. My advice, use a ruler.

Sunday, 15 December 2013

Scale

Following on from the fruit brief, we went on to our next topic - scale. It could be any sort of scale from the scales of justice to reptile scales, even to the Richter scale. I must admit that when I first heard the word scale, it brought a huge wave of panic, my first thought was of strong swear word.This however, was soon replaced by my second more rational thought 'How on Earth I am going to make something out of this!?' Yet, as it was explained to me, the ideas that arose from the panicked state of my mind started to put me at ease. There was the opportunity to create sculptures, spatial designs, costume design from the right topic. It was choosing said topic that was the problem. 

I am not in the habit of picking the most obvious choice - sometimes it's unintentional other times it's deliberate - so it was very difficult for me to find a subject matter that not only interested me, but inspired me. I do apologise for sounding like a broken record but I am a designer, namely a costume designer, trying to find a subject to match my expertise was impossible. Therefore, I settled with the next best thing, textiles - now only the topic remained. What was complex enough for me to look at and easy enough to understand in the restricted time? 

It struck me after watching a documentary of the Japanese Tohoku tsunami in 2011, and the word which had been plaguing my mind for days was attached to the event. The scale of disaster. For a time it was staring me in the face, we are often faced with these images from a day to day basis, but without ever really paying attention to them. So I endeavoured to create a variety of textile pieces based on the events that have caused the most cataclysmic effect on the world. 

Below are a list of the cheery topics:
  • The Black Death (1348- 1350) - 1/3 of the world's population was wiped out by this plague
  •  Hurricane Katrina (2005) -  One of the most expensive and deadliest hurricanes to hit the coast of America costing more than $81 billion.
  • The Indian Floods (2013) - The heaviest monsoon experienced in over 80 years.
  • Tohoku Tsunami Japan (2011) - The most powerful known earthquake to hit Japan
My time was limited so consequently my topics had to be too.